
Finally! The culmination of all your hard work… it’s time to harvest!
As you may know, harvesting weed isn’t the same as harvesting tomatoes.
To get the perfect bud, you need to be very careful with how you handle the harvest of your cannabis plants.
This guide will show you exactly how to harvest weed step by step.
By following these steps, you can ensure that you reap the sticky, smelly, and delicious rewards of high-quality cannabis.
Step 1: When To Harvest Marijuana

The most important factor in harvesting marijuana is actually determining when to harvest your cannabis plants.
When you harvest is vital because the cannabinoids that ultimately create the “high” from cannabis change dramatically depending on when the plant is harvested, so the time to harvest is extremely important.
So how do you know when to harvest?
Method one – Inspect Your Trichomes
The absolute best way to know when your buds are ready is to inspect the trichomes on your buds. These are the little white crystals that cover your buds, which contain the all-important THC.

Trichomes form a few weeks into flowering and begin to grow, multiply, and reach maturity over time.
So how do you know when your trichomes are mature?
You look at their cloudiness and color!

Clear trichomes – If your plant’s trichomes look clear, then they are not ready to harvest. Clear trichomes mean your plants are underdeveloped and can still produce more buds and trichomes. If you were to harvest your plants with clear trichomes, you would experience an energetic high that’s short-lived. Not good
Cloudy Trichomes – For me, this is the perfect time to harvest. If your trichomes look milky or cloudy, they are fully developed and likely to be at their highest potency THC-wise. If you harvest now, you’ll get an energetic and heady Sativa high. Excellent.
Amber/ Cloudy Trichomes – If you’re looking for a more relaxed body high, then you’ll want to harvest when you start seeing the trichomes turn amber. This is an indication that the trichomes are overdeveloped and the THC potency has started to decline.
When To Start Checking Your Trichomes
Timing is everything when harvesting, so you need to know when to start looking for maturing trichomes to help figure out the best time to harvest.
Understanding the different rates of maturity for trichomes in India vs. Sativa strains is essential and will help you understand what each will look like as they mature.

Indica strains reach maturity much faster than Sativa strains, the average is 6-8 weeks of flowering until harvest. You should begin examining trichomes around weeks 5-6 to find your perfect harvest window
Sativa strains are known to take upwards of 8-12 weeks or even longer to reach maturity. Begin checking for trichome maturity around week 8 from flower initiation.
How To Check Your Trichomes

We’ve outlined what to look for and what it tells you about your plant’s maturity, but how do you actually do it?
With a microscope or magnifying glass!
No, you don’t need a fancy microscope and a lab setup, but you will need a handheld pocket scope. Check out this guide I wrote about the best magnifying glass to use from trichomes.
A microscope like this will allow you to see the formation and cloudiness of your trichomes up close. Track the appearance of your trichomes until they correspond to the type of high that you want.
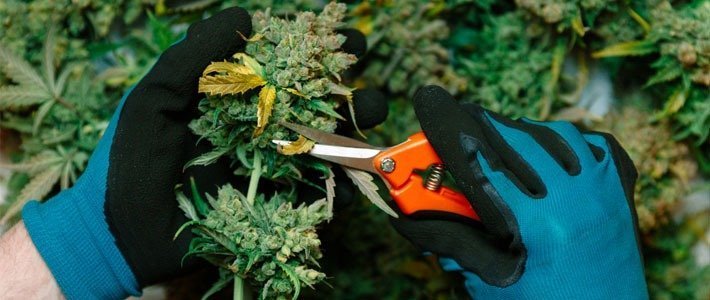
Caution: When examining your trichomes, be gentle with your marijuana plants, and wear nitrile or latex gloves. This is to prevent contaminating or damaging your plants and yourself because of the extreme stickiness involved. The oils in our skin can damage trichomes and degrade their potency.
Other Indicators of Harvest Window
Trichome maturity is the golden standard for determining when to harvest, but there are a few other signs that can indicate harvest time.
Pistil Color – Another reliable indicator of how mature your cannabis plant is by checking your plant’s pistils. Initially, pistils will be yellow-white, but as the plant matures, they will become more orange and amber.

Swollen Calyxes – These are the pods that would contain seeds if they were pollinated, but still swell at maturity. Plump swollen calyxes indicate a cannabis plant is at or near maturity.

Growth – The overall growth in size and mass of your buds will slow or stop. While growth isn’t the most reliable sign, it can be used along with other signs to help pinpoint your harvest time.
After inspecting your marijuana plants to find out when they are ready to harvest, it’s time to cut them down.
Before you begin, make sure you’re ready to handle your harvest.

When To Harvest FAQs
Here are some answers to some common questions that are asked about when growers are decided when to harvest their cannabis
What is the best time of day to harvest cannabis?
The best time of the day to harvest cannabis is in the morning. The main reason for this is that your plant’s terpenes are at their highest level just before the sun comes out (or grow lights come on) However, it also helps make your harvesting more efficient, as you will find it more comfortable harvesting when there is less heat from the sun (or your grow light)
Is it good to harvest weed on a full moon?
Although I’ve not tested this out myself, some growers believe that you will get a better crop (resilience, yield, and potency) if you time your grow to coincide with the cycles of the moon. This requires careful planning and is not something I recommend a beginner worry about.
What happens if you wait too long to harvest?
If you wait too long to harvest, then your plants are susceptible to mold and rot. Your buds will also lose THC and produce a more potent couch-lock effect. For example, if you were growing a Sativa-dominant strain for a euphoric productive high, you might end up with a strain that melts you to the couch. Your weed can also end up tasting really bad if you leave it to flower too long.
Can I harvest my buds early?
Technically, yes, you can harvest your buds early. However, that’s a really bad idea. Harvesting early can lead to poor-quality buds and smaller yields. You really need to wait until your trichomes have started turning amber before you can harvest.
Step 2: Preparing To Harvest
Now that you know exactly when you want to harvest, it’s time to get all the right equipment together.
Prepare Your Harvest Area
Set aside a designated room or area for harvesting your plants. This area is intended to reduce the spread of odor and begin facilitating the curing process as soon as plants are cut down
This area should be 70F (21C) or below to prevent cannabis oils from volatilizing, which helps reduce the odor. If possible, seal the room and vent with a carbon filter to reduce the odor entirely.
Use The Right Harvest Tools
Harvesting weed requires a few specialty tools, some are necessary, and some just make things easier. Getting these ready before harvest will save precious time.
Trimmers – A good set of handheld trimmers will make the time-consuming trim process much easier. I like to use these Fiskars trimmers. They have nonstick blades and stop your hands from cramping up during “trim jail”.
Trim Trays – While not absolutely essential, I highly recommend purchasing a good trim tray. They provide support and comfort while trimming, and catch excess kief and sugar leaves via a mesh screen. I like to make myself a joint using the dust that the tray catches as a reward for the hard trim session.
Gloves – A good pair of nitrile or non-latex gloves are also needed. This prevents the oils in your skin from contaminating buds and keeps your hands from becoming a sticky mess. Gloves will also prevent strong odors from lingering on your hands long after trimming.
Lines – This is less of a tool than just something you want to have ready to hang your plants from. Material isn’t important, it just needs to be sturdy enough to hang your harvest from to aid in drying.
Check out our grow room equipment checklist for a full list of useful equipment to use during your grow.

Step 3: Flushing Before Harvest
Once you have determined when you are going to harvest your plants, you need to begin flushing them.
The purpose of flushing is to remove any residual nutrients and/or chemicals that have accumulated in the flowers. Flushing is done by watering plants with only clean water until you harvest.
Why Flush your plants before harvest?
If you don’t flush, you will very likely have residual fertilizers or nutrients affecting the taste of your smoke. This makes smoking these buds harsh and unpleasant. Un-flushed buds may not burn or will crackle and smell like chemicals when they burn.
Flushing is absolutely necessary if using synthetic fertilizers. If growing completely organically you may not need to flush, or not need to flush as early and heavily.
When To Flush Your Plants
I usually start the flushing process as soon as I start to see the trichomes turn from clear to cloudy (7-10 days before you intend to harvest them.)
How To Flush Your Plants
To flush your plants, you simply need to stop adding nutrients and water your plants with clean water only. By clean water, I mean distilled or RO water (Reverse Osmosis)
If you can only access tap water, use a flushing agent with it.
If you’re growing in soil, just water as needed with clean water throughout this time.
If you’re growing with hydroponics, you’ll need to replace your reservoir with clean water and recirculate for 2-3 days. After 2-3 days, refill your reservoir again with clean water.
My top Flushing Tips
- Make sure you have 10-20% runoff when flushing in soil.
- In soil, allow plants to remain dry for 1-2 days before you intend to harvest. This assists with the drying process.
- In hydro, use a PPM or EC meter to monitor the concentration of your reservoir when flushing. If the concentration is similar to what you’ve been feeding with, keep replacing it with clean water until it lowers significantly.
Flushing FAQs
Here are some answers to common questions that new growers have about flushing.
When should I stop watering before harvesting?
You should stop water as soon as you have completed your flush and then allow 1-3 days before harvesting to allow the soil and stems to completely dry.
What happens when you don’t flush before harvesting?
If you don’t flush your plants before harvesting your buds will contain all of the nutrients and salts that they accumulated over the growing cycle. This will usually lead to your buds tasting bitter and harsh.
Should I let soil dry before harvest?
If you’re growing in soil, it’s a good idea to let the soil dry for a couple of days before you begin harvesting, as this will help speed up the drying process of your buds.
Step 5: Harvesting Your Plants
Now the fun really begins, you can finally start harvesting your beautiful buds.
The most important consideration with this step is to handle your plants and buds properly and in the right environment.
Harvest Environment
In the wrong environment, you can easily damage or degrade the quality of your harvest.
Intense light, temperatures above 80F (27C), friction from handling, damp/humid conditions can all greatly degrade THC.
Proper handling and preparation of your harvest area can eliminate all of these potential problems.
How Should You Cut?
There are two ways to begin harvesting your plants. You can either harvest the whole plant by cutting the main stem or harvest only the most mature buds.
Method 1: Cutting The Main Stem
This method of harvest is quicker, easier, and requires less monitoring of individual bud maturity. You simply need to cut the main stem, then hang or further divide up the plant.
Method 2: Harvesting mature buds first
This harvest method can potentially increase your overall yield and quality.
You first remove the ripest buds (as determined through the previous steps).
Next, you wait 5-10 days for the remaining buds to reach perfect ripeness, then harvest them as well.
The outer buds, which receive more direct light, will always mature first.
Buds not receiving direct light will always take longer to reach maturity until exposed to direct light.
Cutting the main stalk
With either method, you will want something besides trimming scissors to cut through the main stalk. Fiskars All Steel Bypass Pruning Shears are great for just that.
Chopping Time
So you have decided when and how you will harvest your plants, now the next few steps are more about your preference than necessity.
The large trichome-less leaves can be removed, or left attached to the plant. Removing fan leaves will speed up the drying process while keeping them on will allow buds to dry more slowly.
If in a high-humidity environment, removal may help prevent mold.
If in a low-humidity environment, keeping leaves on may help keep the buds from drying too quickly. We have a guide (here) where we go more in-depth on if you actually need a drying room and the benefits of having a drying room.
From now until your cannabis is cured, any and all handling of plants and buds must be done while wearing gloves. THC will stick to everything it touches, and anything loose on you will stick to your buds, keep it clean!
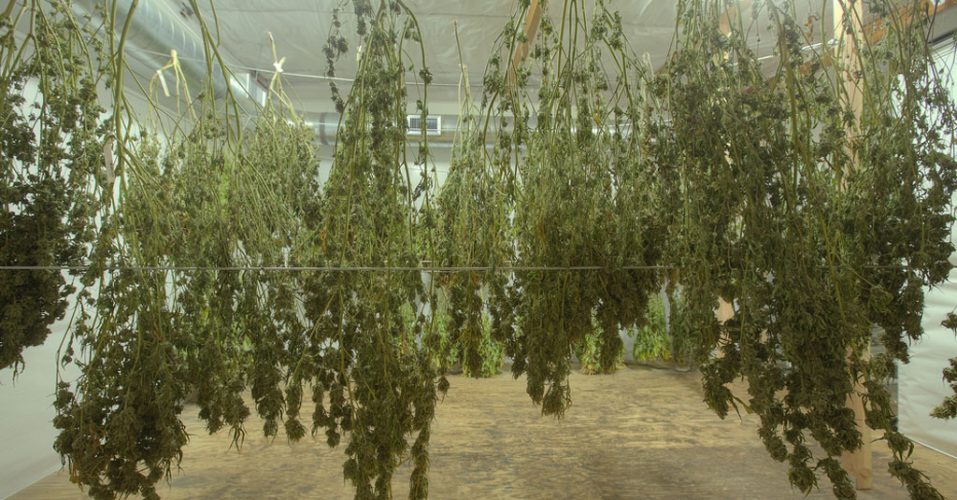
After you cut down your plants, you will want to hang them. Do this along a wire, and space plants evenly so they will dry evenly.
Ensure there is adequate ventilation so that humidity isn’t too high, this can slow drying and cause mold issues. Use a fan to facilitate air exchange for the harvest area if you don’t have a proper drying room.
Step 5: Manicuring the Buds
Once your harvest is complete, there are two different ways to approach the manicuring stage.
You may either immediately trim your leafy buds down to frosty nuggets, or dry them on the line first.
Immediate Trimming
This gives the advantage of easier trimming and faster drying time.
Just after harvest, the leaves that need to be trimmed are still full of water (turgid). Turgid leaves are firm leaves, which make for easy cutting.
Trichomes are more malleable at this point, so they are less likely to be knocked off during handling.
With fewer outer leaves covering the buds, they will dry much more quickly. This can be good if you need to dry quickly or have high humidity.
It can be a problem if you have low humidity as quick-dried buds can be harsh and unpleasant.
Drying on the line
By allowing the buds to slowly dry with most excess plant material still covering the buds, the curing process begins.
Let plants hang on the line until stems bend and begin to break slightly (not snap). This indicates that buds are drying and are ready to be trimmed.
This usually takes 3-10 days depending on your environment, bud size, and amount of material already removed.
Leaves and branches can be trimmed more easily because everything easily snaps off. This can also be an issue because the trichomes will be much more likely to flake off if brushed or mishandled.
Time to Trim
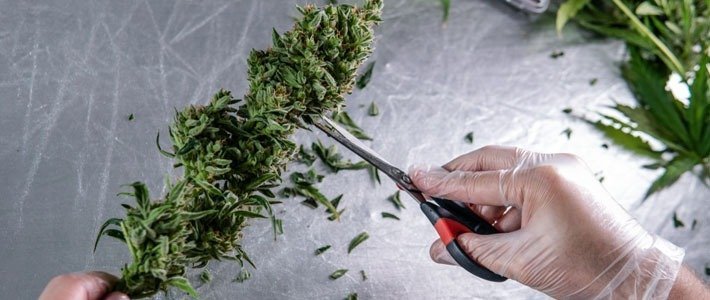
Whether you immediately trim or wait, the process of trimming your buds into their final form is the same.
You want to remove all excess material from around your buds.
How close you trim is mainly preference, although if selling your cannabis, most customers prefer very tightly trimmed buds.
What to remove
Your eyes will be your main reference for this. Remove any large leaves protruding from the buds.

Remove any brown or yellow-tinged leaves from your buds, these will impact the taste and aesthetics of your buds.
If in doubt, remove any leaves that don’t appear to have any trichomes on them. No crystals = no THC = no fun.
Making Trimming Easier
Manicuring buds is laborious and time-consuming, so you might want to utilize some methods and tools to make it easier.
Curved Trimmers – These are trimming scissors with a curved blade. This is ideal for trimming around a relatively oddly shaped object such as a bud. The curve reduces the need to tediously angle your scissors around a bud to get the perfect cut, saving energy and time.
Bowl Trimmers – These are enclosed bowls lined with steel blades and sweeps with a crank attached to move the buds around. Insert some buds and begin turning the crank, this can drastically reduce the time required to trim your harvest. Most have built-in kief catchers as well.
Trim Trays – Trim trays offer greater comfort while trimming, and also collect excess material as you trim. These trays are ergonomically designed for comfort and come with a 150-micron steel screen to catch kief and sugar leaves.
Trim Strategically – Don’t just start hacking all your buds off, try to leave a few inches of stem to hold on to while you trim. Use razors to frequently clean your scissors while trimming. Scissors will quickly become clogged with resin, so free them up to trim more easily.
Final Thoughts – How To Harvest Marijuana
I hope you’ve enjoyed this guide on how to harvest weed step by step.
You should now have successfully harvested your cannabis, but it isn’t time to enjoy the fruits of your labor just yet.
After plants are harvested and buds trimmed, another most important process begins…
In our next article on how to harvest, we will guide you through the stages of the drying and curing process. This process is what will ultimately determine the flavor, smell, and smoothness of your smoke.
Originally posted 2018-10-21 13:40:20.
 James Alexander
Never know when a person will need these types of tools. Yah!
Very Interesting and Informative. Danke
Excellent info. I’ll give it one more close read and with any luck I’ll have some good smoke in a week or two. Thank you.
Great, zhanks for this guide.
Excellent site. Very informative and precise, love the pics, the videos, the links. I learned a lot and am starting my harvest. Thanks!!!
Hi I’m a first time grower and my plant is in week 3 or 4 of flowering, if I could send you a picture you may be able to tell me what’s next for my plant thanks allyn.
feed them high phos. food once /wk or once/two wks and watch them swell
Excellent information. Thanks so much!!
Really helpful! Thanks very much. Unfortunately got a few more weeks to wait.
Nice write up! Time to dry and find your article on curing
Thank you! I’m going to give them another week or two, but what is the danger of waiting too long to chop?
Less THC?
Thanks!
Esinod2020
First time grower. Couldn’t be happier with all the info. Thanks Greenbudguru!
Thanks for the great information and loved the videos
Hi my son’s and i are new as well, your articles if very helpful, Thank you. Fe
Hey Dave, I am from South Africa and never grew before. Can you help me get rich over growing and selling weed?
GreenBudGuru !!
This site is amazing and very informative.
Thank you so much for all the great help regarding anything cannabis.
I recommended your site to other growers i know and the feedback was awesome, so thanks.
All the way from South Africa, Cape Town.
I love this site for rock solid advice. Although i’m not sure I could bring myself to trim those lovely buds as vigorously as your chap, if indeed at all. Ha Ha Ha. Thanks team
Hahaha, yeah i see what you mean. It seems counter productive but it really does help the end result!
i would like to see the comparison here of the trimmed bud and it’s cured version